I started this journey into the installation of the Oracle Analytics Server by giving a high-level view of the process in the first part, followed by more details on the OS preparation, installation, and patching in the second part.
This third, and final, part will focus on the creation of the FMW database schemas and the final configuration of OAS.
By now it’s clear that FMW is the foundation needed by OAS, and FMW also comes with a set of database schemas that are required by the common services it does provide to applications, like OAS, built on top of it. And in addition to that, OAS itself also requires a database schema where to store a lot of things.
Explicit or implicit: doesn’t matter as long as you have them
You could think that the creation of these schemas happens automatically when you do configure OAS, because lately not many talk about this step, but this isn’t fully true.
In OBIEE 11g it was a mandatory step, between the installation of the binaries and the configuration, to run the Repository Creation Utility (RCU) to create all the required schemas.
Starting with OBIEE 12c, and it is still valid with OAS, this step can be skipped. If you do not create the FMW schemas manually, during the configuration of OAS it will be done for you with mostly default values.
FMW database schemas
When talking about the FMW database schemas it is, literally, multiple schemas and not just one (8 to be precise). OAS, just like OBIEE before, does require the BIPLATFORM schema, the main schema where OAS stores several things. This one has some dependencies: MDS, OPSS, IAU, IAU_APPEND, IAU_VIEWER, and WLS. Finally, there is a default one that is automatically created: STB.
- BIPLATFORM: Business Intelligence Platform
- MDS: Metadata Services
- OPSS: Oracle Platform Security Services
- IAU: Audit Services
- IAU_APPEND: Audit Services Append
- IAU_VIEWER: Audit Services Viewer
- WLS: WebLogic Services
- STB: Common Infrastructure Services, formerly Service Table
These are all the schemas you must create to be able to configure OAS later on.
Only some databases are supported for the FMW schemas
Before to start creating the schemas, you must make sure to have a certified database. The list is a lot shorter than you could imagine.
Only Oracle database, SQL Server, and one kind of Oracle Cloud Autonomous Database are supported. No MySQL, no PostgreSQL.
These schemas are a key element in a working OAS setup, don’t mess too much with them. Stick to certified databases for anything related to a production environment. For fun, you could try to use different versions, like for example the newly released Oracle Database 23c Free – Developer Release, but not being certified right now could give you issues if you need support.
Manual creation of the schemas gives you more options
The reason to consider running the RCU manually, between installation and configuration, is to have access to more options. If you don’t have a database account with SYS or SYSDBA privileges you will need to generate the SQL and send it to your DBA. You maybe want to configure the tablespaces these schemas will use, maybe to all use the same instead of creating several different tablespaces. Or even just to be able to set different credentials to each schema.
Talking about credentials: you should consider having different password policies for the passwords of the FMW schemas compared to normal accounts in your database. For example not expiring the password will make your life easier (because while you can change the password later on, it is a more annoying operation).
Last but not least: these schemas aren’t meant for human usage. They are system schemas required by the tools, nobody should have those credentials and use them. At the best, you can give read access to the usage tracking and agents tables, but that’s about everything you should do with the content of the FMW schemas.
The RCU can be executed by simply running <ORACLE_HOME>/oracle_common/bin/rcu. By default, it will start the graphical model with a screen taking you through the various actions (the RCU is used to both create or drop the FMW schemas) and the various settings.
You can also run it automatically in a silent way, but it’s a bit more “fun” than the other parts of the OAS install because it doesn’t support response files. You must provide all the parameters directly when calling the command, and there are a lot of them! The great thing is that the documentation gives a lot of examples of the various parameters, and if needed, have a look at how my Docker image does it.
Configure OAS: when everything becomes alive
Finally the last step of an OAS installation! It’s time to use the binaries installed and makes OAS alive by configuring it. This step will create a domain with all the configurations based on the information you provide, the logs of the whole stack, and also all the scripts to start and stop the environment.
The main information you should provide to configure OAS is a domain name, the default being bi, the directory where to store the domain (and this is very important!), a username and password for the OAS administrator account, the details of the FMW database schemas (or the credentials to create them), the range of ports that OAS should use and finally what part of the product you want to configure (for example, you could decide to configure only BI Publisher).
You can run the configuration by executing <ORACLE_HOME>/bi/bin/config.sh, and here again you can either do it via the GUI taking you through the various stop, or automatically by using a response file.
Be ready: the configuration will take some time, and OAS will be started automatically at the end.
The domain shouldn’t be inside the ORACLE_HOME
By default the GUI will suggest locating the domain in a directory inside ORACLE_HOME, <ORACLE_HOME>\user_projects\domains\<DOMAIN_NAME> to be precise.
Will this work? Sure. Is this a good choice? Not at all!
The ORACLE_HOME is the binaries of the product, if you decide to perform an in-place upgrade you will install the new binaries in a different ORACLE_HOME and upgrade, without moving, the domain. You can easily imagine why having the domain located inside your ORACLE_HOME isn’t a good choice, you will not be able to delete the old ORACLE_HOME after an upgrade.
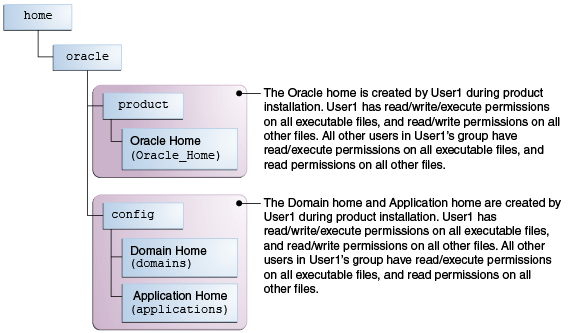
Nowadays the OAS installation documentation also shows a picture of the ideal structure: the domain should be located outside the ORACLE_HOME. As an example in my Docker image, I do store the domain directory in /opt/oracle/config/domains/<DOMAIN_NAME>, while the ORACLE_HOME is /opt/oracle/product/7.0.0. The directories are independent.
Take a note of the ports
The default ports’ range starts at 9500.
- 9500: the WebLogic Admin Server (non-SSL)
- 9501: the WebLogic Admin Server (SSL)
- 9502: the WebLogic managed server bi_server1 (non-SSL)
- 9503: the WebLogic managed server bi_server1 (SSL)
- (ports assigned to various components)
- 9514: the BI Server (OBIS), for RPD online connection
By default, WebLogic is fully non-SSL and ports 9501 and 9503 aren’t used. You can also change them when you configure SSL.
Some good practices for your OAS installation
While it is possible to directly deploy a bundle with your migrated content (from 12c) in OAS at the configuration step, I always go with the APPLICATION_TYPE_EMPTY option. This gives me a working, but empty, environment with default security. It allows me to verify my OAS is working, that there aren’t problems with the environment itself.
Another benefit of the empty environment is the default security model. I stopped counting the amount of people migrating their content, deploying a BAR in their OAS, and losing permissions here and there. A BAR deployment is not a merge, it is a full delete first and insert after. Deployng the security model from a BAR will full delete the default one. If an application role is missing, or a policy is missing, you will not see some features. Have a look at the default security model of a new version, take notes of what role has what policy before to override everything with your content. And after deploying your own BAR, verify if you lost some policies, and if you did and it wasn’t expected, you have the info to recreate them based on the notes you took about the default security model.
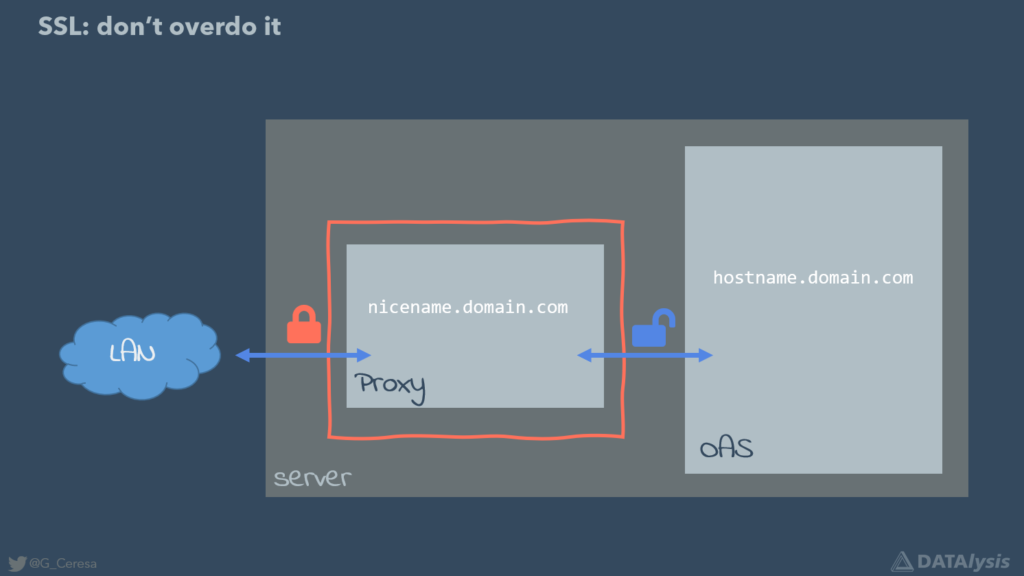
The SSL configuration of OAS is not very complicated, but do you really need it? Maybe a proxy in front doing SSL offloading is more than enough.
Another benefit of a proxy: you can easily use a nice domain name and remove the port from the URL to access your OAS. Something as lightweight as nginx will do the job. And if you need SSO, it will anyway be done in a proxy (Apache HTTP Server) in front of OAS.
Backup, backup, backup! You must define your backup strategy right after you finished installing. Not only because you could kill your OAS when deploying your content or configuring things, but because if you don’t, you will probably never do it till it’s too late.
Time to enjoy your OAS
You now know a lot about Oracle Analytics Server installation. Everything said in these three parts is valid for every Oracle Analytics Server release so far, and mostly also for OBIEE 12c.
There was no screenshot of the installation in these posts, that’s because I didn’t do a graphical installation for a very long time. Scripting it is not too difficult and is so much faster: run a script, come back 15-20 minutes later and OAS is fully installed and configured.
The Docker image gives you all the code snippets needed to fully automate your installations.
Time to enjoy OAS!
Hi Gianni,
Thanks for the steps. I am able to install it easily.
After installation OAS looking fine .Just want to understand in existing OBIEE12c environment ,we have “ACT as”(obiee proxy) functionality enabled. But in OAS “ACT AS ” functionality is not there it seems. Do we have any alternative way to achieve this functionality.
Thanks in advance, your suggestion is much appreciated.
Act-as is still part of OAS, but since the very first release of OAS it is marked as deprecated and didn’t receive updates or evolutions (because OAC doesn’t support it and Oracle is trying to figure out a possible alternative etc.).
https://docs.oracle.com/en/middleware/bi/analytics-server/whats-different-oas/index.html#GUID-C907A4B0-FAFD-4F54-905C-D6FCA519C262__SECURITY
As the doc says, you can enable it, there is a document in MOS explaining how to do it.
Hi Gianni,
I have to drop a big thank you to you, I am pretty new to this topic, and it becomes a bit clearer after reading your blog.
But I have still some questions. I am planning an upgrade from a 6.4 to the latest release , OAS 7.6 (2024) on a new VM.
I guess, I am not able to use the current database schemas as using a new Server, so I think I have to create the database schemas new, means I need to run RCA with the new 2024 installation am I correct ?
Thanks in advance and I really appreciate your help
Hi,
If you are doing an out of place upgrade, which is what it sounds like (because your OAS 7.6 will be on a new vm), then yes, you need a brand new set of database schemas for your OAS 7.6. Correct, you run the RCU from your 7.6 installation and create the schemas and finish to install your OAS 7.6 as a fully working environment. Then you can import the BAR you exported from your OAS 6.4 and job done.
Thank you so much for confirming
Hi Gianni,
do you have any experiences with Security/Policy issues when upgrading to 7.6.
My bar file can be imported without any issues to the 7.6 environment, but somehow the policies are not working. Even after manually mapping the application roles and everything.
BR
Hi,
Never had issues. When you import an older BAR to a newer environment, you can lose pieces because the BAR import does a full replace, not a merge. You should always consider if that’s the best way to migrate your security. Doing it in a controlled way outside the BAR import is often the best option.
Hi Gianni,
thank you for the reply.
Actually I am thinking about alternative ways to get the application roles and everything created in a manual way.
I tired to avoid this, as it could be a hell of work creating roles and polices for > 200 users with own roles and groups…
What is the best way in your opinion? Looking in the legacy environment and re-creating in the new environment?
BR
SK
If you have such a large security model, I’m sure you didn’t build it manually, and you aren’t maintaining it manually through the GUI. If you are, then that’s where the issue is. This must be scripted. And OBIEE 12c or OAS all share the same FMW main release, meaning that the commands to build the security model are the same between these versions, therefore you can easily re-apply the script to then new version. You will only need to adjust some inheritance pieces to make sure you are using the correct default application roles (if you are using that).
The scripted security model can also cover policies if needed.
That is, what I would except as well, but unfortunately there are no scripts or anything, even no SME’s.
they have a lot of users, but as far as I did understand from the legacy environment is, they can be grouped, so at the end it would like, 25 roles/groups, 200 users…
I will go through the Metalink to find a way to automatize it, but I have to say the documentation of oracle fusion/middleware is not so good as it is for oracle enterprise products like databases/OCI etc…
Thanks
SK
The documentation is split across many documents because the database is a single product, while OAS has a WebLogic layer (where embedded lightweight LDAP with users and groups, if used, is), FMW (where the application roles and policies are) and OAS (where other privileges and permissions are). Therefore it requires to go through the layers and find what is in charge of which piece. But everything can be scripted, it’s all about finding if it’s worth the effort.
This blog is much appreciated with some great high level steps!
One question though and this may be a bit silly but in terms of “hardware requirements” I cant seem to find a single document that states explicitly for example “16GB of ram is required” etc. Having said this, how does one figure out CPU/RAM/Disk space needed for an installation?
Thank you!
There isn’t a formal list of minimum required hardware anymore. I believe it’s mostly because each usage is very much different and therefore there isn’t a formula giving CPU/ram/disk for X users anymore, because it’s all about what the users will do. And also, many (most?) are on cloud or virtualized solution where they can scale up and down the resources in a click.
What I can say is that OAS requires at least 8Gb of ram. That’s definitely the minimum to start, and you will see that starting the stack will take ages. Some heavy tasks could benefit from a bit more. This is for a dev instance. On disk OAS itself doesn’t take much: 20Gb and OAS is installed and has even spare space for logs. But what about datasets your users could load? Those could be 200Gb more, but only you can know if they will exist or not.
CPU is also a bit similar: 2 cpus (cores or equivalent) generally are enough to start with a dev environment, but then you need to scale that based on the load you are going to have on your environment.
You usage will define the resources you need: how many active users at maximum at the same time? What kind of activity are they going to do? How much ML do you plan to use? All factors heavily impacting (increasing) the bare minimum requirements.
Hello Gianni,
Thank you for sharing your guidance on installing Oracle Analytic Server.
I have a question for you. Before Oracle Analytic Server, we installed BI Publisher and deployed Oracle Identity Manager report templates. However, I haven’t found those report templates for Oracle Analytic Server. Does Oracle Analytic Server provide report templates for Oracle Identity Manager? If so, it would make our work easier.
Hi,
If you look for some pre-built Publisher reports using Identity Manager as source (statistics or other kind of reports), then no. OAS is empty, it doesn’t come with any content, it only provides the product. Everything related to data is up to you to provide/build it.